
pytest-自动化的强大骨架
Pytest是python的一种单元测试框架,主要有如下特点:
简单灵活,容易上手
支持参数化
能够支持简单的单元测试和复杂的功能测试,还可以用来做selenium/appnium等自动化测试、接口自动化测试(pytest+requests)
pytest具有很多第三方插件,并且可以自定义扩展,比较好用的如pytest-selenium(集成selenium)、pytest-html(完美html测试报告生成)、pytest-rerunfailures(失败case重复执行)、pytest-xdist(多CPU分发)等
测试用例的skip和xfail处理
可以很好的和jenkins集成
report框架----allure 也支持了pytest
安装
pip install pytest验证安装是否成功,并查看pytest版本
pytest -V第一个pytest程序
首先了解pytest的运行规则:
查找当前目录及其子目录下以test开头或者结尾的py文件
找到文件后,在文件中找到以test_开头方法并执行。
import pytest


class TestPytest:
    """
    测试类
    """

    def test_print(self):
        """
        测试方法
        """
        print("helloworld")
使用IDE运行(python tests for xxx)后返回:
Launching pytest with arguments TestPytest.py --no-header --no-summary -q in xxxxxx

============================= test session starts =============================
collecting ... collected 1 item

TestPytest.py::TestPytest::test_print PASSED                             [100%]helloworld


============================== 1 passed in 0.01s ==============================
注意,若代码中出现异常,则不会执行测试
运行模式
pytest的运行是使用命令行运行的,运行结构为:
pytest [options] [file_or_dir] [file_or_dir] [...]常用参数:
直接运行py文件中所有test_方法,默认从上到下(根据代码编写的顺序)运行程序,使用mark标记更改运行的程序@pytest.mark.run(order=3)
pytest test.py当某个py文件中存在多个类时,想要运行其中某个类
pytest test.py::TestOne运行py文件中某个类的某个方法
pytest test.py::TestOne::test_one运行多个py文件
pytest test01.py test02.py pytest.main()
pytest 运行用例的时候,一般用命令行去执行,pytest.main()可以以调用python类的方式去执行pytest
在使用方法前,import pytest
例子1:
pytest.main(["test.py"])等价于
pytest test.py例子2:
pytest.main(["test.py::Test::test01"])等价于
pytest test.py::Test::test01例子3:
pytest.main(["-s","case/test.py::Test::test01"])等价于
pytest -s case/test.py::Test::test01例子4:
pytest.main(["-s","--maxfail=2","case/test.py::Test::test01"])等价于
pytest -s --maxfail=2 case/test.py::Test::test01pytest执行流程
pytest的整个测试分成如下6个阶段:
1. pytest_configure
插件和conftest.py文件配置初始化等,创建session。
2、pytest_sessionstart
创建session完以后,执行collection之前的阶段。会调用pytest_report_header向terminal打印一些环境信息,比如插件版本,python版本,操作平台这些等。
3、pytest_collection
测试用例收集以及生成测试输入的过程,这里还可能包括根据keywords和marker筛选测试用例的过程。这个过程会涉及多次generate item的调用,主要关注如下调用:
pytest_generate_tests(metafunc): 生成测试项;
pytest_make_parametrize_id(config, val, argname):根据@pytest.mark.parametrize生成对应值;
pytest_collection_modifyitems(session, config, items):所有测试项收集完毕以后调用,一般用来进行重新排序和二次过滤。
pytest_deselected(items): 有测试项被关键字或者marker过滤掉的时候会被调用
注意: 通过::语法筛选测试用例的步骤是在之前生成测试用例阶段完成的,并不是在deselected里面做的
4、pytest_runtestloop
执行筛选过的测试用例, 在pytest_runtest_protocol里面完成包括setup, call, teardown和log打印的过程。主要关注如下调用:
pytest_runtest_logstart(nodeid, location):开始执行一个新测试项的时候调用.
注:官方文档的意思表述的有点模糊,并不是setup/call/teardown阶段分别调用一次,就是函数命令一直的意思测试开始前打印一次
pytest_runtest_logfinish(nodeid, location): 结束执行一个测试项的时候调用. 注:同上
pytest_runtest_setup(item): 在pytest_runtest_call执行之前调用.
pytest_runtest_call(item): 执行实际的测试过程。
pytest_runtest_teardow(item, nextitem): 在pytest_runtest_call执行之后调用
pytest_fixture_setup(fixturedef, request):执行fixture的setup过程(是否执行取决于fixture是否需要创建).
pytest_fixture_post_finalizer(fixturedef, request): 执行fixture的teardown过程(如果有)。
pytest_runtest_makereport(item, call): 返回给定item和call对应的 pytest.runner.TestReport 对象, 这里的call object我们一般不太接触,pytest/runner.py里面有具体的用法可以参考。
pytest_runtest_logreport(report): 在测试的setup/call/teardown阶段report更新之后分别被调用到,可以用when属性来区分不同阶段。
pytest_report_teststatus(report, config): 返回各个测试阶段的result, 可以用when属性来区分不同阶段。
5、pytest_sessionfinish
所有测试执行完毕之后,返回exit status之前的阶段。会调用pytest_terminal_summary向terminal打印一些summary信息,比如pass, fail, error数量之类的总结信息。
def pytest_terminal_summary(terminalreporter, exitstatus, config):
    '''收集测试结果'''
    print(terminalreporter.stats)
    print("total:", terminalreporter._numcollected)
    print('passed:', len([i for i in terminalreporter.stats.get('passed', []) if i.when != 'teardown']))
    print('failed:', len([i for i in terminalreporter.stats.get('failed', []) if i.when != 'teardown']))
    print('error:', len([i for i in terminalreporter.stats.get('error', []) if i.when != 'teardown']))
    print('skipped:', len([i for i in terminalreporter.stats.get('skipped', []) if i.when != 'teardown']))
    # terminalreporter._sessionstarttime 会话开始时间
    duration = time.time() - terminalreporter._sessionstarttime
    print('total times:', duration, 'seconds')
6、pytest_unconfigure
session结束以后,整个process退出之前的阶段。
setup
用途
setup 是 Pytest 中的一个特殊函数,在测试函数运行之前被调用。它可以用于为每个测试准备测试环境,例如创建测试数据或初始化系统设置。
定义
使用 setup 函数来设置一个类或模块的测试准备工作。下面是一个示例,展示了如何使用 setup 函数:
import pytest

class Test_Demo():

    def setup_class(self):
    	print("初始化")

    def test_case1(self):
        print("开始执行测试用例1")
        assert 1 + 1 == 2

    def test_case2(self):
        print("开始执行测试用例2")
        assert 2 + 8 == 10

    def test_case3(self):
        print("开始执行测试用例3")
assert 99 + 1 == 100只需要在类或者模块中重写setup_xxxx方法,即可自定义setup要处理的事情
作用范围
function
每个测试函数前运行setup_function方法,注意只在模块内的函数用例生效,不在类里面
import pytest

def setup_function():
    print("运行初始化")

def test_case1(self):
	print("Test01")

def test_case2(self):
	print("Test02")

def test_case3(self):
	print("Test03")
运行结果:
运行初始化
PASSED                     [ 33%]Test01
运行初始化
PASSED                     [ 66%]Test02
运行初始化
PASSED                     [100%]Test03
method
测试类中每个测试方法前调用一次setup_method方法
class Test_Demo():
    def setup_method(self):
        print("运行初始化")

    def test_case1(self):
        print("Test01")

    def test_case2(self):
        print("Test02")

    def test_case3(self):
        print("Test03")
运行结果:
运行初始化
PASSED                     [ 33%]Test01
运行初始化
PASSED                     [ 66%]Test02
运行初始化
PASSED                     [100%]Test03
class
在测试类中前调用一次setup_class方法
class Test_Demo():
    def setup_class(self):
        print("运行初始化")

    def test_case1(self):
        print("Test01")

    def test_case2(self):
        print("Test02")

    def test_case3(self):
        print("Test03")
运行结果:
运行初始化
PASSED                     [ 33%]Test01
PASSED                     [ 66%]Test02
PASSED                     [100%]Test03
module
模块中的第一个测试用例开始前执行setup_module方法
import pytest

def setup_module():
    print("运行初始化")

class Test_Demo():
    def test_case1(self):
        print("Test01")

    def test_case2(self):
        print("Test02")

    def test_case3(self):
        print("Test03")
运行结果:
运行初始化
PASSED                     [ 33%]Test01
PASSED                     [ 66%]Test02
PASSED                     [100%]Test03
teardown
用途
teardown 是 Pytest 中的一个特殊函数,在测试函数运行之后被调用。它可以用于清理测试环境,例如删除测试数据或重置系统设置。
定义
使用 teardown 函数来清理一个类或模块的测试清理工作,下面是一个示例,展示了如何使用 teardown 函数:
import pytest

def teardown_function(function):
    data = {'key': 'value'}
    del data

def test_something():
    data = {'key': 'value'}
assert data['key'] == 'value'只需要在类或者模块中重写teardown_xxxx方法,即可自定义teardown要处理的事情
作用范围
function
每个测试函数后运行teardown_function方法,注意只在模块内的函数用例生效,不在类里面
import pytest

def teardown_function():
    print("运行结束")

def test_case1(self):
	print("Test01")

def test_case2(self):
	print("Test02")

def test_case3(self):
	print("Test03")
运行结果:
PASSED                     [ 33%]Test01
运行结束
PASSED                     [ 66%]Test02
运行结束
PASSED                     [100%]Test03
运行结束
method
测试类中每个测试方法后调用一次teardown_method方法
class Test_Demo():
    def teardown_method(self):
        print("运行结束")

    def test_case1(self):
        print("Test01")

    def test_case2(self):
        print("Test02")

    def test_case3(self):
        print("Test03")
运行结果:
PASSED                     [ 33%]Test01
运行结束
PASSED                     [ 66%]Test02
运行结束
PASSED                     [100%]Test03
运行结束
class
在测试类中后调用一次teardown_class方法
class Test_Demo():
    def teardown_class(self):
        print("运行结束")

    def test_case1(self):
        print("Test01")

    def test_case2(self):
        print("Test02")

    def test_case3(self):
        print("Test03")
运行结果:
PASSED                     [ 33%]Test01
PASSED                     [ 66%]Test02
PASSED                     [100%]Test03
运行结束
module
模块中的第一个测试用例开始后执行teardown_module方法
import pytest

def teardown_module():
    print("运行结束")

class Test_Demo():
    def test_case1(self):
        print("Test01")

    def test_case2(self):
        print("Test02")

    def test_case3(self):
        print("Test03")
运行结果:
PASSED                     [ 33%]Test01
PASSED                     [ 66%]Test02
PASSED                     [100%]Test03
运行结束
fixture
用途
做测试前后的初始化设置,如测试数据准备,链接数据库,打开浏览器等这些操作都可以使用fixture来实现
测试用例的前置条件可以使用fixture实现
支持经典的xunit fixture ,像unittest使用的setup和teardown
fixture可以实现unittest不能实现的功能,比如unittest中的测试用例和测试用例之间是无法传递参数和数据的,但是fixture却可以解决这个问题
定义
通过@pytest.fixture()装饰器装饰一个函数,标记该函数是一个fixture
import pytest

@pytest.fixture()
def fixtureFunc():
    return 'fixtureFunc'

def test_fixture(fixtureFunc):
    print('我调用了{}'.format(fixtureFunc))

if __name__=='__main__':
    pytest.main(['-v', 'test_fixture.py'])
运行后,pytest调用test_fixture方法前会调用fixtureFunc方法。
作用范围
fixture包含一个叫scope(作用范围)的可选参数,用于控制fixture执行和销毁逻辑的频率。@pytest.fixture()的scope参数有4个值:function、class、module、session,默认为:function。
function
函数级别的的fixture每个测试方法只需要运行一次。
配置代码(@pytest.fixture()部分)在调用方法(test_xxxx部分)之前运行,销毁代码在调用方法之后运行。
由于是默认,在定义一章中已演示完毕
也可以在调用方法的时候提供多个fixture,在执行fixture时会根据形参的顺序执行,例如:
import pytest

class A:
    @pytest.fixture()
    def fixtureFunc01(self):
        return 'fixtureFunc01'

    @pytest.fixture()
    def fixtureFunc02(self):
        return 'fixtureFunc02'

    def test_case01(fixtureFunc01,fixtureFunc02):
        print(f"先调用{fixtureFunc01},后调用{fixtureFunc02}")

if __name__=='__main__':
    pytest.main(['-s', 'test_fixture.py::A'])
class
类级别的fixture的每个测试类只需要运行一次,无论测试类中有多少类方法都可以共享这个fixture。
import pytest

class A:
    @pytest.fixture(scope="class")
    def fixtureFunc(self):
        return 'fixtureFunc'

    def test_case01(fixtureFunc):
        print('我调用了{}'.format(fixtureFunc))

    def test_case02(fixtureFunc):
        print('我调用了{}'.format(fixtureFunc))

if __name__=='__main__':
    pytest.main(['-s', 'test_fixture.py::A'])
module
模块级别的fixture每个模块只需要运行一次,无论模块里面有多少个测试函数、类方法或其他fixture都可以共享这个fixture。
import pytest

@pytest.fixture(scope="module")
def fixtureFunc(self):
    return 'fixtureFunc'

def test_case(fixtureFunc):
    print('我调用了{}'.format(fixtureFunc))

class A:

    def test_case01(fixtureFunc):
        print('我调用了{}'.format(fixtureFunc))

    def test_case02(fixtureFunc):
        print('我调用了{}'.format(fixtureFunc))

if __name__=='__main__':
    pytest.main(['-s', 'test_fixture.py'])
session
会话级别的fixture每次会话只需要运行一次,一次pytest会话中的所有测试函数、方法都可以共享这个fixture。
数据驱动测试(DDT)
数据驱动测试(DDT,Data-Driven Tests)是一种软件测试方法,其核心理念是将测试逻辑与测试数据分离,使测试用例的设计、执行和维护更加灵活、高效。
在数据驱动测试中,测试脚本保持相对固定,而测试数据则从外部数据源(如文件、数据库、Excel表格等)动态获取。这种方法允许测试人员使用相同的测试脚本对大量不同的输入数据进行验证,以确保软件在各种边界条件、异常情况和典型场景下都能正确运行。
为了在pytest使用DDT,可以使用 @pytest.mark.parametrize 装饰器来实现数据驱动测试。该装饰器的使用接收两个参数,解释如下:
第一个参数:传入测试方法的形参,可以将它们以逗号分隔的形式放在一个字符串中,或者作为一个元组传递。
第二个参数:测试数据。用列表存储,包含了一系列元组或其他可迭代对象(如列表、字典等),每个元组或对象对应一组测试数据。pytest会按顺序为每组数据调用一次测试函数
下面是一个简单的例子,演示了如何使用 @pytest.mark.parametrize 进行数据驱动测试:
import pytest


class Test01:

    @pytest.mark.parametrize("a, b, c",[
        (1, 1, 2),
        (1, 2, 3),
        (1, 3, 4),
        (1, 3, 5),
        (1, 8, 10),
    ])
    def test_01(self, a, b, c):
        print(a+b==c)

    @pytest.mark.parametrize("a, b",[
        (1, 1),
        (1, 2),
        (1, 3),
        (1, 3),
        (1, 8),
    ])
    def test_02(self, a, b):
        print(a==b)

if __name__ == '__main__':
    pytest.main(["-s", "-x", "Test_pytest.py::Test01"]) # 测试整个测试类中的所有函数
	# pytest.main(["-s", "-x", "Test07.py::Test01::test_01"]) # 测试测试类中的单个测试函数
运行结果如下:
======================================================================== test session starts ========================================================================
platform win32 -- Python 3.11.3, pytest-7.3.1, pluggy-1.0.0
rootdir: C:\project
plugins: allure-pytest-2.13.2, Faker-18.9.0, repeat-0.9.1, rerunfailures-11.1.2, testreport-1.1.6
collected 10 items

Test_pytest.py True
.True
.True
.False
.False
.True
.False
.False
.False
.False
.

======================================================================== 10 passed in 0.11s =========================================================================
pytest的ddt可以测试测试类中的每个测试函数,也可以独立一个测试函数进行测试。
常用插件
pytest-repeat
用于重复执行某个用例
安装
pip install pytest-repeat重复执行
输入命令
pytest -s --count=2 Test01.py::TestA::test_case01 # 运行两次Test01.py中的TestA类中的test_case01方法也可以与-x结合使用,重复执行直到失败后停下来
pytest -x --count=100 Test01.py::TestA::test_case01 # 运行100次Test01.py中的TestA类中的test_case01方法,直到失败如果要在代码中将某些测试用例标记为执行重复n次,可以使用@pytest.mark.repeat(n),例如:
@pytest.mark.repeat(5)
def test_case01(self):
print("执行用例")编辑完毕后执行命令pytest -s Test01.py::TestA::test_case01,可以看到重复执行了多次
pytest-rerunfailures
用于在某个用例失败后重跑
安装
pip install pytest-rerunfailures命令行运行
有两个关键参数,分别是--reruns和--reruns-delay,它们的作用与格式如下:
# 失败重运行最大次数为3次
pytest --reruns 3 Test001.py::Test001
# 两次重运行之间增加延时10s
pytest --reruns 3 --reruns-delay 10 Test001.py::Test001
装饰器方式
我们可以制定在具体的某个用例进行错误重跑,使用@pytest.mark.flaky装饰器即可。比如:
import pytest

@pytest.mark.flaky(reruns=3, reruns_delay=2)
class Test001:
    @pytest.mark.flaky(reruns=3, reruns_delay=2)
    def test_01(self):
        print('---用例01---')

    def test_02(self):
print('---用例02---')其中reruns与reruns_delay的作用与命令行作用一致,分别是失败重运行最大次数与两次重运行之间增加延时
上面的代码在命令行中同等于:
pytest --reruns 3 Test001.py::Test001
pytest --reruns 3 Test001.py::Test001::test_01
若失败则会继续重跑
pytest-testreport
pytest-testreport是一个针对pytest的生成html报告的插件,使用起来非常简单,安装好pytest-testreport之后,运行用例时加上参数即可生成报告
注意点:如果安装了pytest-html这个插件,请先卸载,不然会有冲突
安装
pip install pytest-testreport命令行解释
首先是pytest.main方法的例子
pytest.main(["-s" ,
             "--report=_report.html",  # 指定报告文件名
             '--title=test_report 测试报告',  # 指定报告标题
             '--tester=xxxxx',  # 指定报告中的测试人员
             '--desc=报告描述信息',  # 指定报告中的项目描述
             '--template=1',  # 指定报告模板样式(1 or 2)
             "Test_test.py::Test_test"
             ])
其等价于:
pytest -s --report=_report.html --title="test_report 测试报告" --tester=xxxxx --desc="报告描述信息" --template=1 Test_test.py::Test_test各大命令行解释如下:
--report:设置报告文件名与路径--title:设置测试报告大标题--tester:设置报告中的测试人员--desc:设置报告中的项目描述--template:指定报告模板样式,一共有两个,参数为1或者2
运行效果
Allure
Allure 框架是一种灵活的、轻量级、支持多语言测试报告工具,它不仅能够以简洁的 Web 报告形式显示已测试的内容,而且允许参与开发过程的每个人从测试的日常执行中提取最大限度的有用信息。同时支持多种语言包括 Java、Python、JavaScript、Ruby、Groovy、PHP、.Net、 Scala。
安装
首先安装allure-pytest
pip install allure-pytest之后,下载allure命令行工具
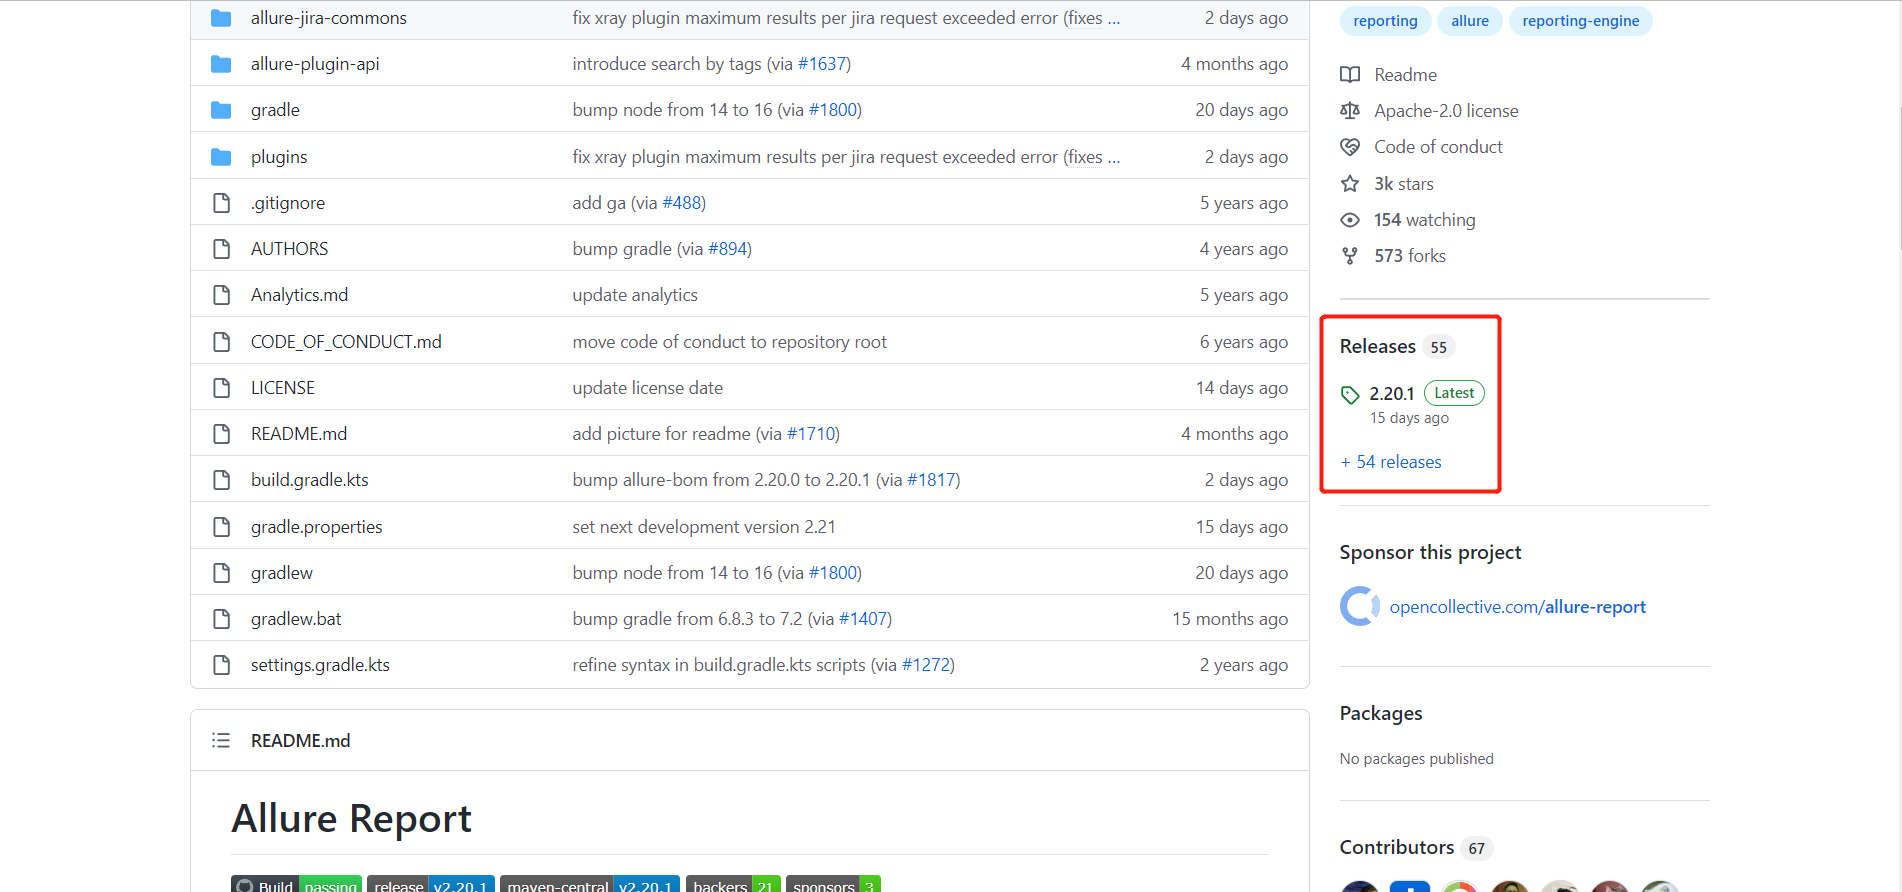
首先进入官网,往下滑动找到Download字样,也可以进入github
进入github后,点击releases,然后下载allure-xxx.zip
解压,配置环境变量,为:
%allure_home%\bin
进入命令行,输入allure --version检查是否配置成功,若配置环境变量输入该命令行无效,则尝试重启电脑
demo
参考:pytest文档29-allure-pytest(最新最全,保证能搞成功!) - 腾讯云开发者社区-腾讯云 (tencent.com)
编辑代码:
import allure
import pytest

@pytest.fixture(scope="session")
def login():
    print("用例先登录")

@allure.step("步骤1:点xxx")
def step_1():
    print("111")

@allure.step("步骤2:点xxx")
def step_2():
    print("222")

@allure.feature("编辑页面")
class TestEditPage():
    '''编辑页面'''

    @allure.story("这是一个xxx的用例")
    def test_1(self, login):
        '''用例描述:先登录,再去执行xxx'''
        step_1()
        step_2()
        print("xxx")

    @allure.story("打开a页面")
    def test_2(self, login):
        '''用例描述:先登录,再去执行yyy'''
        print("yyy")
使用以下命令执行用例:
pytest -s --alluredir ./report Test01.py执行完成后,在当前目录下,report目录会生成原始文件,这个只是测试报告的原始文件(json格式),不能打开成html的报告
在当前目录下(若命令行不在则cd到该目录),执行命令启动服务:
allure serve report/完毕后弹出默认浏览器,命令行会出现以下文字:
Generating report to temp directory...
Report successfully generated to C:\Users\Bell\AppData\Local\Temp\17675750725245119916\allure-report
Starting web server...
2022-11-23 16:17:23.425:INFO::main: Logging initialized @2366ms to org.eclipse.jetty.util.log.StdErrLog
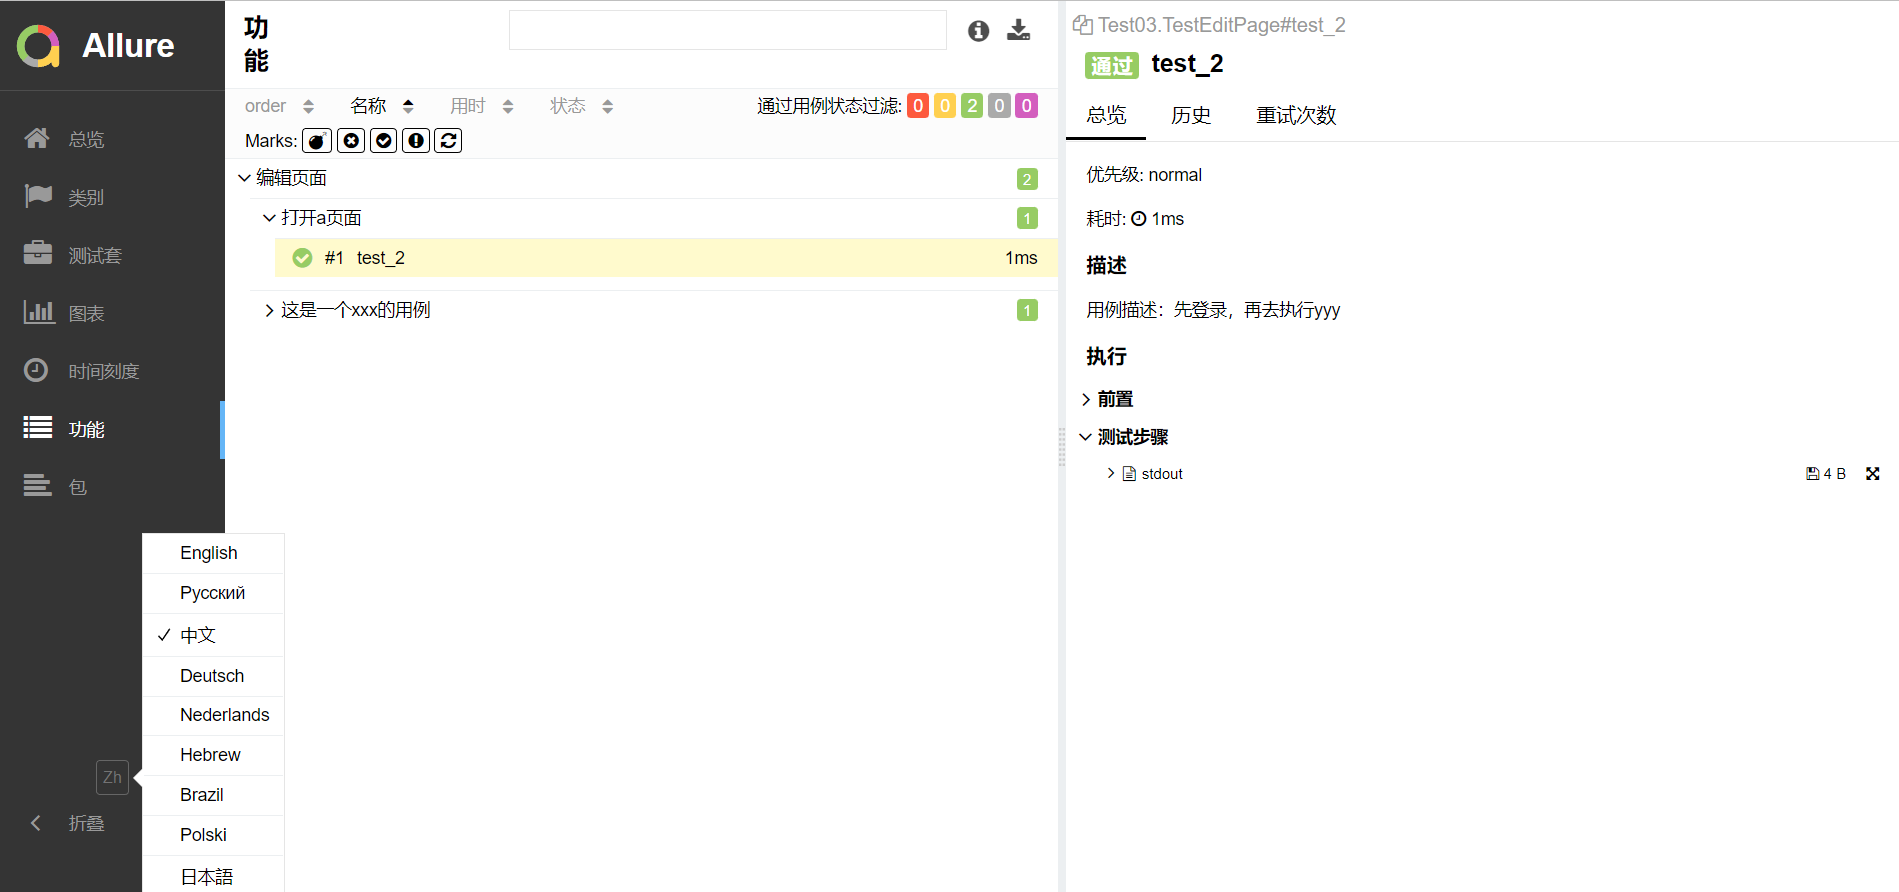
Server started at <http://192.168.3.136:2512/>. Press <Ctrl+C> to exit在浏览器中切换中文:
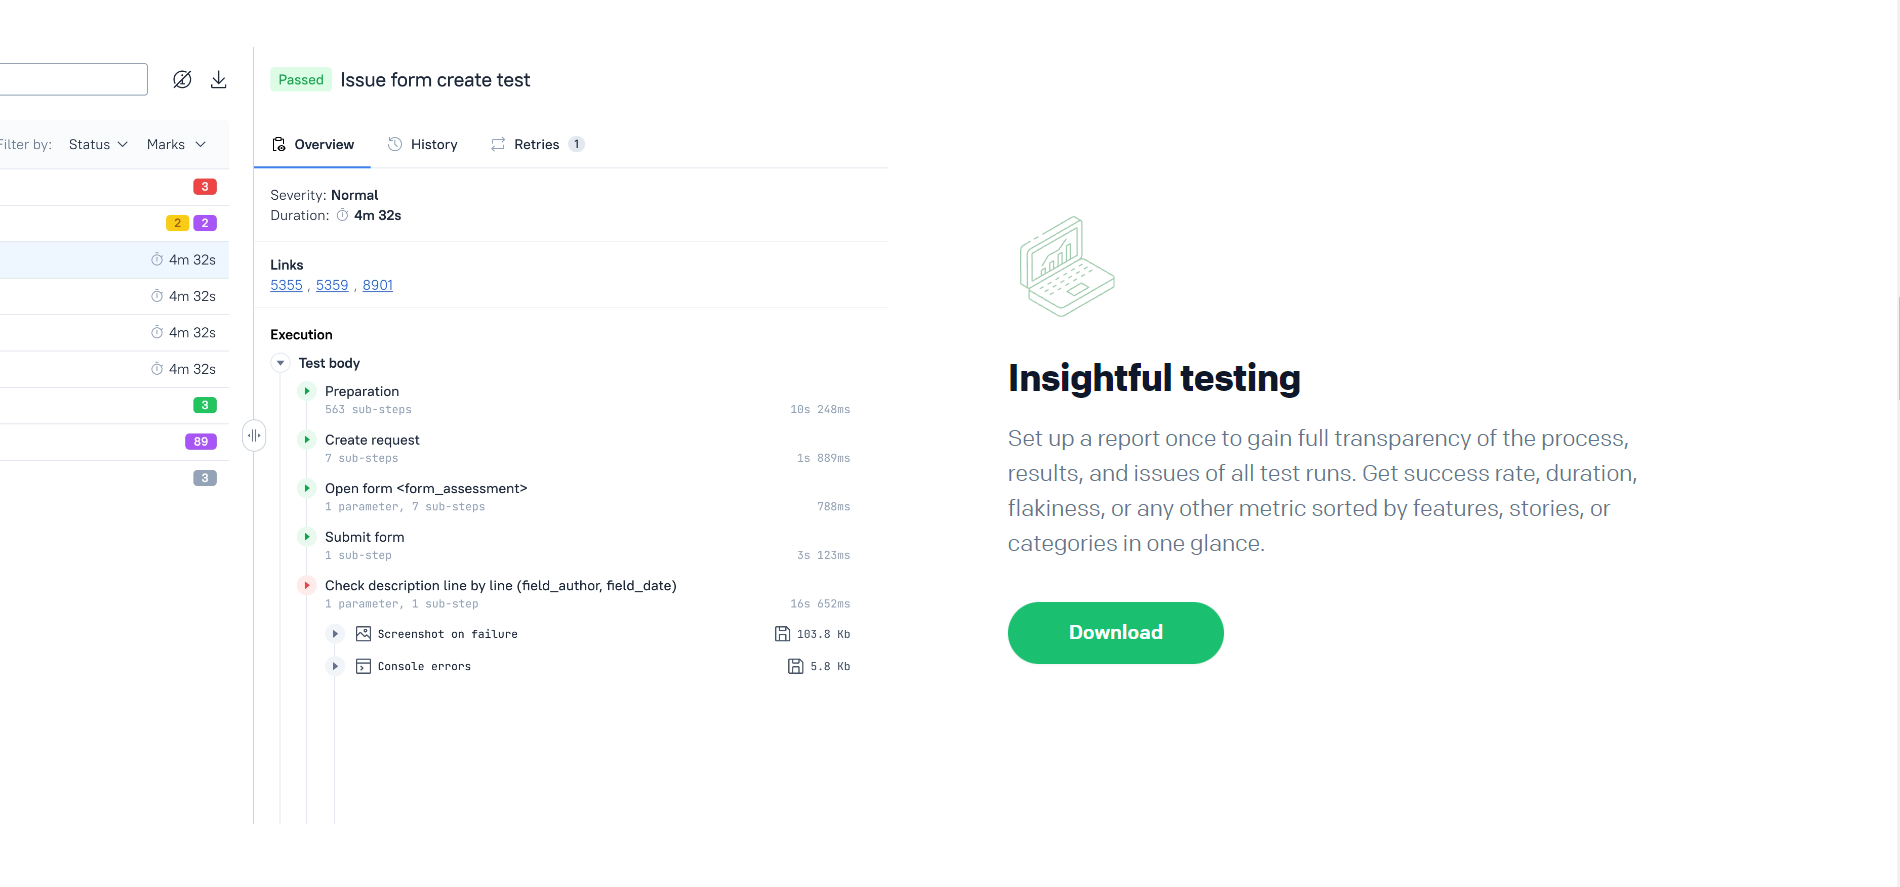
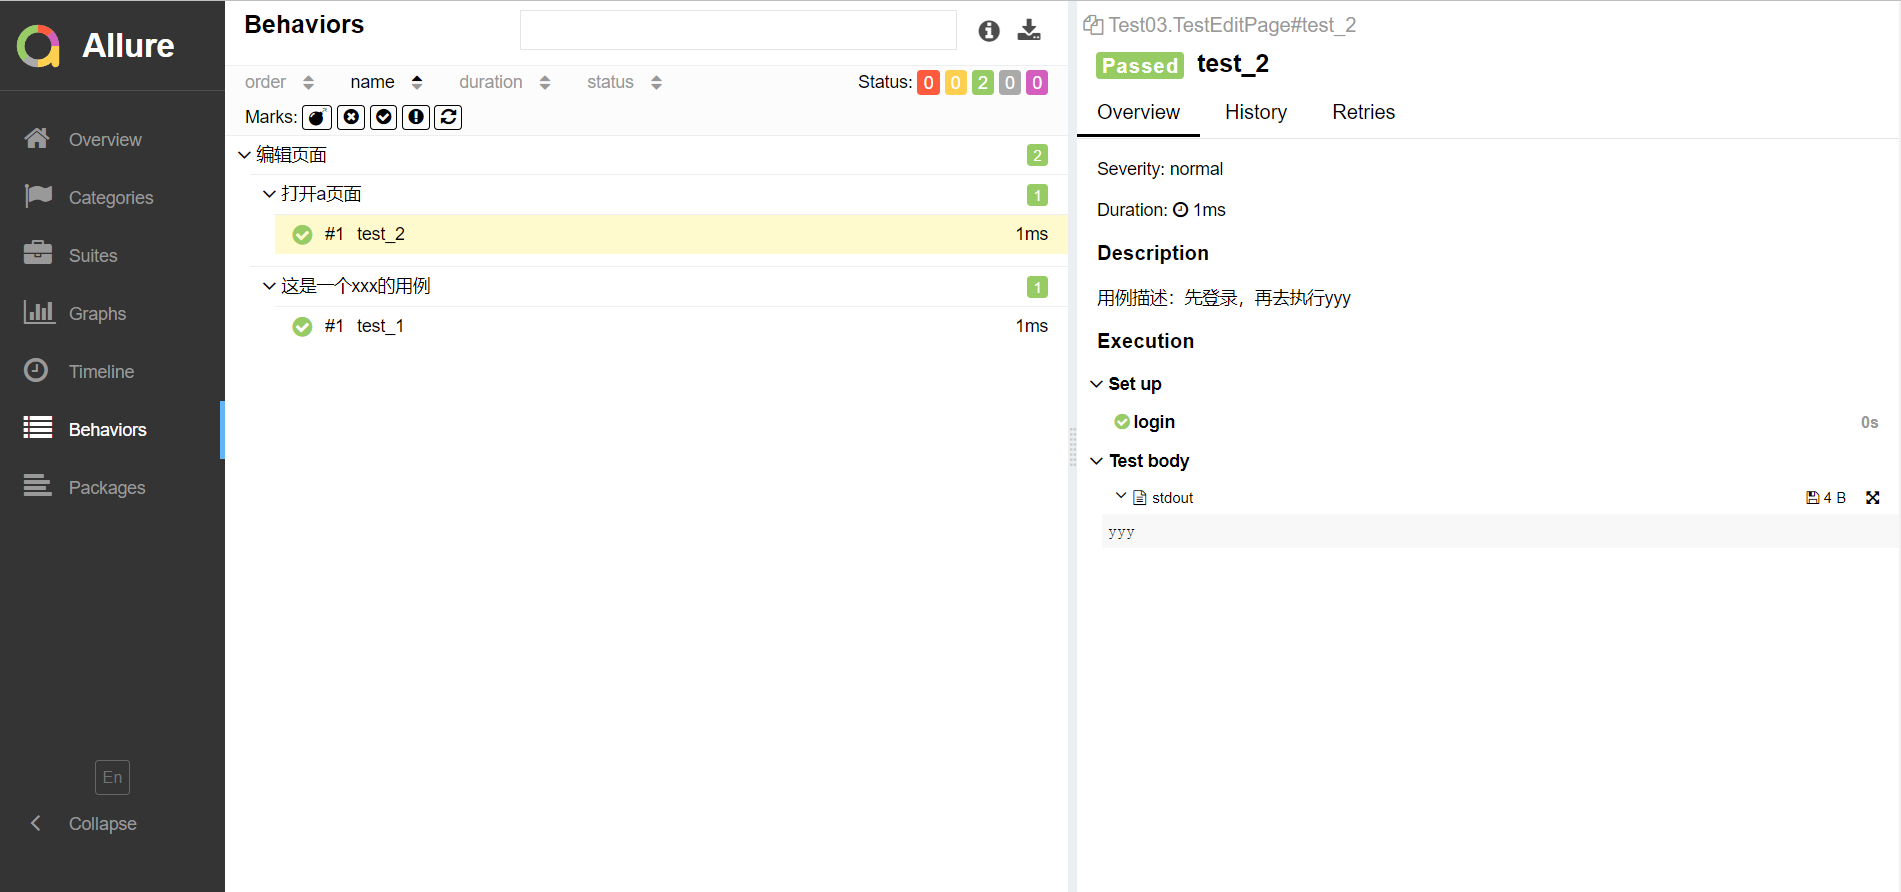
查看报告:
为了方便,可以使用如下命令将json文件转换成html文档:
allure generate report/ -o report/html --cleanreport/为allure报告的json原始文件的路径,-o report/html为指定allure生成html报告的文件路径,--clean表示如果已经存在生成报告路径文件夹时,会清理当前的文件